Monday, February 25, 2008
Web Parts generator tool
Background
From the moment I started working with Web Parts and portal framework the thing that I missed the most was a designer that I could use to create and separate Web Part's design/layout from the "code behind". The way Web Parts are supposed to work is similar to Web Server Controls meaning that you have to add all the controls manually to Controls collection and you have to render them from your code "manually".
The idea
Some time ago I read a great article made by Michiel Van Otegem about skinned controls. Based on his idea and based on functionality of his SkinnedPart class I made BaseSkinnedWebPart which is a slightly improved Michiel's control. BaseSkinnedWebPart allows us to create Web Part's design/layout in an ASCX control and use it as separate file (skin) that defines the layout of Web Part and specifies all the controls of the Web Part.
Time saving solution
The thing that still bothered me a lot is that I had to write a lot of code just to assign all server controls from ASCX to member variables in Web Part, to validate if required controls are present in ASCX or not and similar common things. In a project I was involved in recently we had a Web Part with near 350 server controls so just to create initial Web Part class with all server controls from ASCX (skin) I had to type more than 1000 lines of code risking that I'll make a mistake and spending a valuable time.
In order to overcome that I got to idea of writing a generator tool that will generate the initial Web Part class with all the assignments, validations etc based on previously made ASCX control (skin for Web Part).
The tool
After some time I made the first version of the generator tool (called it swpgen.exe) and published it on codeplex. You can check the project’s home page here or first release’s page here
I also published an article on codeproject describing the details on how to use swpgen.exe generator tool. You can read it hereLabels: ASCX, MOSS, Portal Framework, Web Part
posted by Popovic Sasa
Monday, February 04, 2008
Unit testing internal units/methods - Friend Assemblies
Why?
I was asked about this a few times although there are a number of articles on this subject. The thing is that people usually know about that posibility and how it should be implemented but have difficulties implementing it to the end (especially in case of strongly signed assemblies).
What is the problem?
You set the InternalsVisibleTo attribute on an aseembly level and then you are able to access the internal methods of the assembly from another assembly. But the catch is in the proper way InternalsVisibleTo attribute should be configured.
There were a few examples on web that were not completelly accurate and leaded to confusion. The thing is that number of articles said that PublicKeyToken should be set for strongly named assemblies but actually PublicKey should be set instead.
A very detailed spec with examples on this (and accurate) can be found here: Friend Assemblies (C# Programming Guide)
posted by Popovic Sasa
Monday, January 28, 2008
Signing a 3rd party DLL
Why?
A few days ago I got a question that I was asked a few months ago and the same thing I needed a few times already by myself. The thing is that we often get a 3rd party DLL/assembly that is not signed and we have to use it from a signed DLL/assembly.
In most cases it would be a copyright issue to disassemble someone’s work/dll and modify it but in some cases you are either allowed to do that or you will get a signed version from the owner sooner or later but you need to start with development immediately and not to lose valuable time.
If you are allowed to do that then this is the solution you may use.
How?
The idea I found some time ago goes like this:
1. Use disassembler to generate the MSIL code
2. Use the assembler to reassemble the MSIL code into the binary assembly and sign it at the same time
Here is an example of how to do that:
1. ildasm /tokens /out=TempUnsignedAssembly.il A3rdPartyAssembly.dll
2. ilasm /dll /key=TemporaryKey.snk TempUnsignedAssembly.il /out=A3rdPartySignedAssembly.dll
Here are a few comments on commands above:
- A3rdPartyAssembly.dll should be replaced with the name of 3rd party DLL/assembly you want to sign
- TemporaryKey.snk is strong name key that you will need to generate and use for 3rd party DLL/assembly signing
- A3rdPartySignedAssembly.dll should be replaced with the name of DLL that you want to get as result of these operations (it will be a signed version of original 3rd party DLL).
NB: don’t forget to check the license agreement and to ask for a signed DLL from the 3rd party before you deliver your product or before you go to production with it.
posted by Popovic Sasa
Saturday, January 05, 2008
Custom paging SPGridView control
Why new grid?
I needed a paged grid control on one of the projects I was involved in recently. It was a MOSS 2007 project, I wanted the grid to look similar to MOSS 2007 grids so my first choice was SPGridView control. When I tried the control I saw its built-in paging functionality is not suitable for my needs because SPGridView expects the whole result set and then it does the paging automatically. Because of very large result set that my grid should show in MOSS that was not a solution for me.
Therefore I started looking for a solution that will allow me a kind of custom paging where only results that should be shown on a current page are retrieved from data store and assigned to grid control.
The solution
I couldn't find one but I remembered that I read once about a similar grid control for ASP.NET published on CodeProject by Fadrian Sudaman (http://www.codeproject.com/KB/aspnet/GridViewNeatPaging.aspx). I used similar idea, created my own control that inherits from SPGridView and decided to share that with Microsoft community. I created a project on CodePlex and published my code there: http://www.codeplex.com/aspnetlibrary
I also created a sample project that demonstrates the usage of my grid control. The project consists of a sample web part, some SQL to generate sample database with a stored procedure that retrieves paged data and configuration files to allow automated deployment of sample web part to MOSS 2007.
posted by Popovic Sasa
Friday, April 06, 2007
Serving files from server
A Common Question
I often receive questions about file serving from both my colleagues and users of different discussion groups. There are two ways a file can be served from server to client. One way is to automatically offer the user to open or save a file and another way is to force web browser to open the file. Implementation is quite simple and to be able to implement one of the options developer should be familiar with RFC 1806 which defines “Content-Disposition” header.
Solution
The first thing that should be done is getting the content of the file. Another thing that should be known is the file type and its MIME type. When file is read into a byte array buffer, serving of file can start.
The key is in setting the right value of “Content-Disposition” header. The header can receive two values: “inline” and “attachment”. If one wants to open a file directly in browser then “inline” should be used. The “inline” value will tell browser to open the content directly in browser’s window and defined content type will tell the browser how to open the file. If one wants to offer an “Open / Save” dialog so that user can choose the action then “attachment” value should be used.
Examples
Next example shows how PDF file can be read and served to browser so that browser automatically opens it in its window; example is written in C#:
FileStream fs = File.OpenRead("filename.pdf");
Response.AppendHeader("Content-disposition", "inline; filename=" + "filename.pdf");
Response.AppendHeader("Pragma", "no-cache");
Response.AppendHeader("Expires", "Mon, 1 Jan 2000 05:00:00 GMT");
Response.AppendHeader("Last-Modified", DateTime.Now.ToString() + "GMT");
Response.Expires = -1;
Response.ContentType = "application/pdf";
Response.BinaryWrite(GetWholeFileContent(fs, (int)fs.Length));
Response.Flush();
In example above GetWholeFileContent is custom method that returns byte array from input stream.
If one would like to offer an “Open/Save” dialog instead of automatically opening the file then only change in example above would be change of “Content-Disposition” header from “inline” to “attachment”.
If different file type should be served and not the PDF file type then instead of “application/pdf” the right content type should be set. To find out which content type should be set visit http://www.iana.org/assignments/media-types/.
posted by Popovic Sasa
Tuesday, March 20, 2007
Configuring CruiseControl .Net to work with multiple Subversion repositories
What is this article about?
CruiseControl.NET (CCNet) is an Automated Continuous Integration server, implemented using the Microsoft .NET Framework. This article will not explain what continuous integration is and how CruiseControl .Net works and will assume that readers already have a basic knowledge of the system. In this article I’ll write about how CruiseControl .Net should be configured in order to work with Subversion when more subversion providers should be used.
Prerequisites
Next list shows the software that should be installed on machine running CruiseControl .Net server:
1. FxCop version 1.35 should be installed on machine.
2. NUnit version 2.2.8 or later should be installed on machine.
3. NCover and NCoverExplorer should be installed on machine.
4. SVN (svn-win32-1.4.3) should be installed on machine and access to Subversion from that machine must be enabled
Configuring CruiseControl .Net
This example will show you how to configure CCNet for solution consisting of projects hosted on different repositories.
The first thing you should do is to create a msbuild configuration and file structure on local file system that will hold the temporary files and results of build.
After you have all the folders and files ready (msbuild, fxcop, ndpend, etc) you should edit your ccnet.config file and follow next steps:
1. Under <cruisecontrol> section add new <project> section like this:
<cruisecontrol>
<project name="PrjName" workingdirectory="C:\CCNet\PrjName\">
</project>
</cruisecontrol>
2. Replace PrjName with the name of your project and set the correct path to the folder where your configuration files are located.
3. Under <project> tag add a sourcecontrol tag with attribute type set to multi:
<sourcecontrol type="multi">
</sourcecontrol>
4. Now add a sourceControls tag with autoGetSource attribute set to true:
<sourcecontrols autogetsource="true">
</sourcecontrols>
5. For each of the projects located on different subversions add a new svn section like this:
<svn>
<executable>c:\program files\svn-win32-1.4.3\bin\svn.exe</executable>
<trunkurl>svn://server/trunk/folder1/prj1/</trunkurl>
<tagonsuccess>false</tagonsuccess>
<username>username</username>
<password>password</password>
<workingdirectory>C:\CCNet\PrjName\Code\folder1\prj1</workingdirectory>
<autogetsource>true</autogetsource>
</svn>
6. Set “trunkUrl”, “username”, “password” and “workingDirectory” parameters to right values.
7. Add <tasks>, <publishers> and <triggers> sections to your ccnet.config file and save the file.
The whole configuration file should now look like this:
<cruisecontrol>
<project name="PrjName" workingdirectory="C:\CCNet\PrjName\">
<sourcecontrol type="multi">
<sourcecontrols autogetsource="true">
<svn>
<executable>c:\program files\svn-win32-1.4.3\bin\svn.exe</executable>
<trunkurl>svn://server/trunk/folder1/prj1/</trunkurl>
<tagonsuccess>false</tagonsuccess>
<username>username</username>
<password>password</password>
<workingdirectory>C:\CCNet\PrjName\Code\folder1\prj1\</workingdirectory>
<autogetsource>true</autogetsource>
</svn>
</sourcecontrols>
</sourcecontrol>
<tasks>
<msbuild>
<executable>C:\WINDOWS\Microsoft.NET\Framework\v2.0.50727\MSBuild.exe</executable>
<projectfile>PrjName.msbuild</projectfile>
<buildargs>/noconsolelogger /p:Configuration=Debug</buildargs>
<targets>BuildAll</targets>
<timeout>400</timeout>
<logger>C:\Program Files\CruiseControl.NET\webdashboard\bin\ThoughtWorks.CruiseControl.MsBuild.dll</logger>
</msbuild>
</tasks>
<publishers>
<merge>
<files>
<file>nunit-results.xml</file>
<file>Coverage.xml</file>
<file>CoverageReport.xsl</file>
<file>PrjName.FxCop.xml</file>
<file>NDependOut\ApplicationMetrics.xml</file>
<file>NDependOut\AssembliesBuildOrder.xml</file>
<file>NDependOut\AssembliesDependencies.xml</file>
<file>NDependOut\AssembliesMetrics.xml</file>
<file>NDependOut\InfoWarnings.xml</file>
<file>NDependOut\NDependMain.xml</file>
<file>NDependOut\TypesDependencies.xml</file>
<file>NDependOut\TypesMetrics.xml</file>
</files>
</merge>
<xmllogger>
</publishers>
<triggers>
<!-- Check for modifications each 30 minutes -->
<intervaltrigger seconds="1800" buildcondition="IfModificationExists">
</triggers>
</project>
</cruisecontrol>
For all the problems you might have check the ccnet.log file in CCNet\server folder.
posted by Popovic Sasa
Friday, February 23, 2007
Sharing cookies between sub-domains
The challenge
Today we had a new challenge while working on one of new .Net projects. The thing is that we needed to exchange a cookie between two applications that are hosted on same domain but on different sub-domains. Simple sharing between sub-domains does not work by default – if you create a cookie in one application you will not be able to access it from the other application hosted on some other sub-domain.
How it works in production environment
Solution to this problem is actually quite simple when applications run on actual domain and not in development environment. For example, if you have two applications hosted on domain “mydomain.com” under sub-domains “app1.mydomain.com” and “app2.mydomain.com” and you want application1 to create a cookie that application2 will be able to read you can do it like this:
1. In application 1 create a cookie like this:
HttpCookie cookie = new HttpCookie("app1cookie", "val");
cookie.Domain = ".mydomain.com";
response.Cookies.Add(cookie);
Notice the value of Domain property. It is set to “.mydomain.com”. The dot in front of the domain name will allow the cookie to be shared between all sub-domains in domain “mydomain.com”.
2. In application 2 access the cookie like this:
string cookieValue = request.Cookies["app1cookie"].Value;
Problem in development environment
The thing is that we needed to implement this feature and use it also in development environment. To simulate production environment we did next thing:
1. Added two entries to hosts file (you can find it here: c:\WINDOWS\system32\drivers\etc\hosts):
127.0.0.1 app1.projectname.local
127.0.0.1 app2.projectname.local
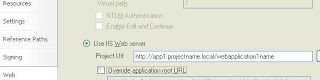
2. Set “Project URL” parameter for application 1 web project to: http://app1.projectname.local/webapplication1name like on image below:
3. Set “Project URL” parameter for application 2 web project to:
http://app2.projectname.local/webapplication2name
4. Create a cookie in application 1 like this:
HttpCookie cookie = new HttpCookie("app1cookie", "val");
cookie.Domain = ".projectname.local";
response.Cookies.Add(cookie);
5. In application 2 access the cookie like this:
string cookieValue = request.Cookies["app1cookie"].Value;
When you now start application 1 from Visual Studio 2005 startup page will be opened under: http://app1.projectname.local/webapplication1name/startuppage.aspx and application 2 will be able to access the cookie that application 1 created.
What is also important to notice here is that in examples above I used hard-coded value for domain name but that was only for demonstration. In real life projects you must define that value in Web.config file and later when application is going to be deployed to staging/production server you will replace the value with actual domain name.
posted by Popovic Sasa
|

